阿里云服务器搭建小程序教程
阿里云服务器搭建小程序教程
阿里云是国内知名度较高的服务器供应商之一, 为用户提供了强大的云服务虚拟产品,满足个人或者企业实现云端网站建设、小程序搭建或网络应用,那么如何使用阿里云服务器搭建小程序;
1、首先我们来到阿里云官网,登录自己的账号,点击控制台;
2、来到控制台后我们可以看到我们所购买的服务器,我们点击并进入,可以看到服务器的详细页面;
3、我们此时可以点击右边的远程连接,我们会看到一个Workbench远程连接弹窗,直接点击立即登录;
4、输入我们的密码确定进入;
5、此时需要我们安装一些软件,这里我们使用yum源安装,执行安装Nginx的命令:
yum update && yum -y install nginx;
6、运行Nginx;
systemctl start nginx;
7、测试Nginx是否安装成功,需要我们在浏览器输入:http://“ECS服务器公网IP”;如果我们输入以上地址后,回车后我们
可以看到页面如果出现了welcome to Centos,表示我们安装成功了;
8、创建后端服务;
a、新建一个服务目录
mkdir /data && cd /data;
b、新建编辑Python服务依赖文件
im requirements.txt;
c、vim进入编辑,点击i键进入编辑,输入以下内容
aliyun_python_sdk_core==2.13.36
aliyun_python_sdk_ecs==4.24.62
Flask==2.0.3
d、内容输入完成后,按退出Esc键,输入:x保存退出;
e、再执行以下命令安装依赖。
pip3 install --upgrade pip && pip3 install -r requirements.txt
f、新建并编辑Python服务编码。
vim get_server_info.py
g、打开VIM编辑器,输入I键编辑,输入以下内容。
# -*- coding: utf-8 -*-
from flask import Flask, jsonify, request
from aliyunsdkcore.client import AcsClient
from aliyunsdkcore.auth import credentials
import requests
import json
from aliyunsdkecs.request.v20140526 import DescribeInstancesRequest, DescribeInstanceStatusRequest
app = Flask(__name__)
metaUrl = 'http://100.100.100.200/latest/meta-data/ram/security-credentials/EcsRamRoleTest'
region = 'cn-beijing'
# 获取临时身份凭证
def getStsToken():
tokenResponse = requests.get(metaUrl)
return tokenResponse.json()
# 在app.route装饰器中声明响应的URL和请求方法
@app.route('/ecs/getServerInfo', methods=['GET'])
def getServerInfo():
tokenResult = getStsToken()
accessKeyId = tokenResult['AccessKeyId']
accessSecret = tokenResult['AccessKeySecret']
securityToken = tokenResult['SecurityToken']
credential = credentials.StsTokenCredential(accessKeyId, accessSecret, securityToken)
client = AcsClient(credential=credential, region_id=region)
# GET方式获取请求参数
instanceId = request.args.get("instanceId")
if instanceId is None:
return "Invalid Parameter"
# 查询实例信息
describeInstancesRequest = DescribeInstancesRequest.DescribeInstancesRequest()
describeInstancesRequest.set_InstanceIds([instanceId])
describeInstancesResponse = client.do_action_with_exception(describeInstancesRequest)
# 返回数据为bytes类型,需要将bytes类型转换为str然后反序列化为json对象
describeInstancesResponse = json.loads(str(describeInstancesResponse, 'utf-8'))
print(describeInstancesResponse)
if len(describeInstancesResponse['Instances']['Instance']) == 0:
return jsonify({})
instanceInfo = describeInstancesResponse['Instances']['Instance'][0]
# 查询实例状态
describeInstanceStatusRequest = DescribeInstanceStatusRequest.DescribeInstanceStatusRequest()
describeInstanceStatusRequest.set_InstanceIds([instanceId])
describeInstanceStatusResponse = client.do_action_with_exception(describeInstanceStatusRequest)
describeInstanceStatusResponse = json.loads(str(describeInstanceStatusResponse, 'utf-8'))
instanceStatus = describeInstanceStatusResponse['InstanceStatuses']['InstanceStatus'][0]['Status']
# 封装结果
result = {
# cpu数
'Cpu': instanceInfo['Cpu'],
# 内存大小
'Memory': instanceInfo['Memory'],
# 操作系统名称
'OSName': instanceInfo['OSName'],
# 实例规格
'InstanceType': instanceInfo['InstanceType'],
# 实例公网IP地址
'IpAddress': instanceInfo['PublicIpAddress']['IpAddress'][0],
# 公网出带宽最大值
'InternetMaxBandwidthOut': instanceInfo['InternetMaxBandwidthOut'],
# 实例状态
'instanceStatus': instanceStatus
}
return jsonify(result)
if __name__ == "__main__":
app.run()
h、完成后,按下ESC,输入:x,保存退出。
9、安装uWSGI Server
上面完成了服务端,接下来需要我们安装使用uWSGI来启动Flask服务;
1、执行以下安装uWSGI命令;
pip3 install uwsgi
2、创建uwsgi文件;
cd /data &&vim uwsgi.ini
3、进入vim,按i进行编辑;
[uwsgi]
#uwsgi启动时所使用的地址和端口
socket=127.0.0.1:5000
#指向网站目录
chdir=/data
#python启动程序文件
wsgi-file=get_server_info.py
#python程序内用以启动的application变量名
callable=app
#处理器数
processes=1
#线程数
threads=2
#状态检测地址
stats=127.0.0.1:9191
#保存启动之后主进程的pid
pidfile=uwsgi.pid
#设置uwsgi后台运行,uwsgi.log保存日志信息 自动生成
daemonize=uwsgi.log
1、完成后,按ESC键,输入:x保存并退出编辑。
2、运行uwsgi server
uwsgi uwsgi.ini
3、输入以下命令查看uwsgi服务,若看到下面的图则说明服务启动成功。
ps aux | grep uwsgi

10、配置Nginx并且重新启动;
1、创建配置文件
vim /etc/nginx/conf.d/app.conf
2、进入VIM,按i进入编辑模式;
server {
listen 80 default_server;
server_name app.example.com;
root /var/www/html;
# Add index.php to the list if you are using PHP
index index.html index.htm index.nginx-debian.html;
location / {
# 转发端口
uwsgi_pass 127.0.0.1:5000;
include uwsgi_params;
}
}
3、完成后,按ECS键,输入:x保存退出;
4、重新启动Nginx。
nginx -s reload
5、检验是否匹配成功;
curl http://127.0.0.1/ecs/getServerInfo
如果结果是Invalid Parameter 表示服务配置成功。
11、去注册小程序;
在开发小程序之前,需要我们先申请注册微信小程序。
1、进入小程序注册页面,根据要求添写我门相关的信息资料,完成账号申请;

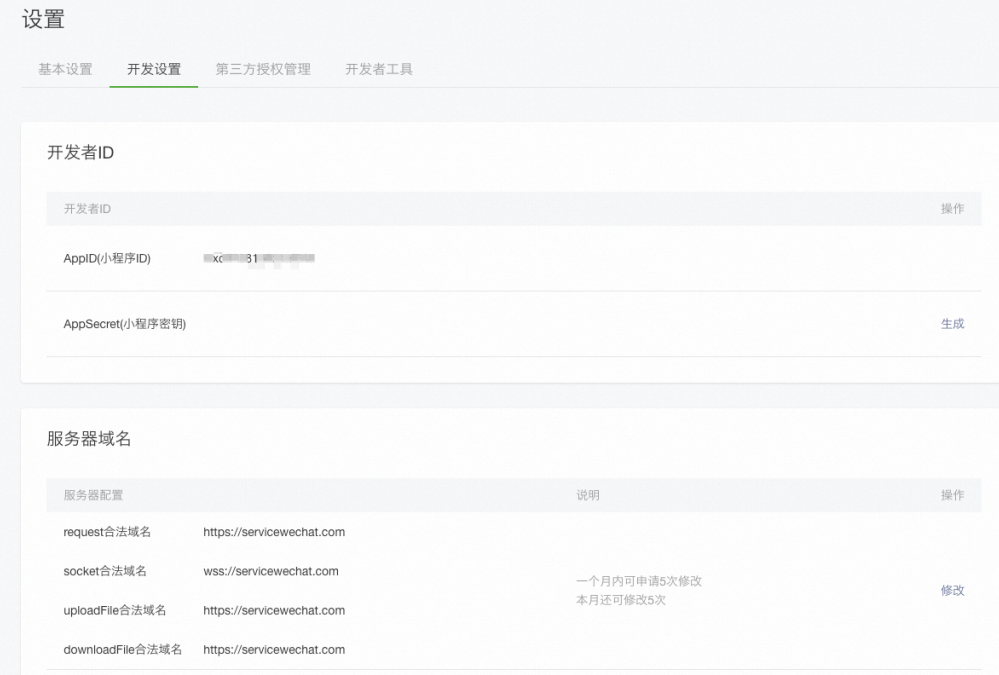
12、用我门申请的微信公众平台账号登录小程序后台,点击开发管理和开发设置,可以看到小程序的appid,
记录下来后面需要使用;
13、安装小程序并开发环境;
启动后端服务后,我们下来要开发小程序,先安装程序环境。
1、安装NOde.js开发环境。
2、下载小程序开发安装工具。
3、打开开发工具,并用微扫码登录。
4、点击创建微信小程序实例。

然后再进行调试盛情上线就可以了;