 编辑搜图
编辑搜图
前面已经完成了Tekton的安装和理论知识的介绍,如果你认真的看完了文章,相信你会有所收获。
这篇文章主要带你来真正实践一下,完成自己的第一条流水线。
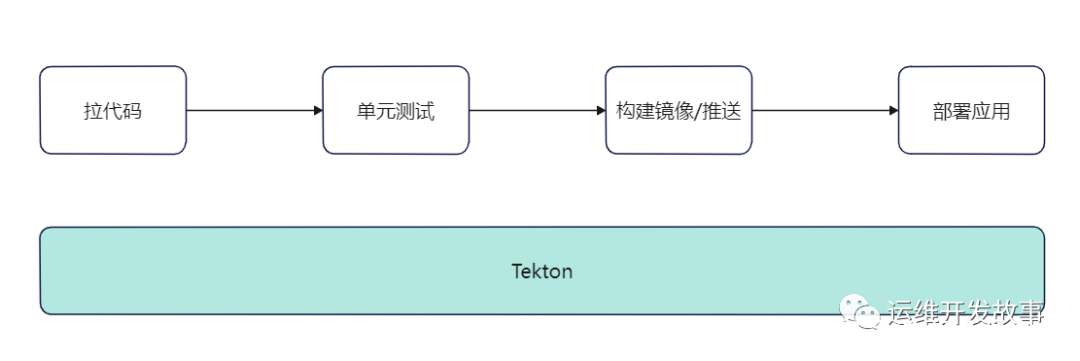
我们流水线的整体流程如下。
 编辑搜图
编辑搜图
整个流程是不是很简单?是的,这是最基本的流程,其实只需要把最基本的搞通,其他的都是在基础之上进行扩展。
这里使用Go简单写了一个小代码用于测试,地址是:https://gitee.com/coolops/devops-hello-world.git。
如果使用Jenkins来实现上面的功能,就只需要编写一个Jenkinsfile,然后在里面写4个stage就好。现在用Tekton,就需要将上面的步骤定义为4个Task,然后通过Pipeline将它们串起来,下面会先定义Task,再将Task组合成Pipeline。
拉取代码
代码是交付的基石,是后续的所有动作做铺垫的,我们需要创建一个拉取代码的Task。
不过这个Task,我们可以不用自己写,直接用Tekton Hub上别人写好的,地址是:https://hub.tekton.dev/tekton/task/git-clone。这个Task支持的功能比较全,参数也比较多,具体有哪些参数可以到上面的地址进行查看和学习。
其安装方式有两种:kubectl和tkn客户端。
(1)使用kubectl进行安装。
kubectl apply -f https://raw.githubusercontent.com/tektoncd/catalog/main/task/git-clone/0.5/git-clone.yaml1.
(2)使用tkn客户端进行安装。
tkn hub install task git-clone1.
我这里使用的第二种安装方式,安装后可以看到具体的Task。
# tkn hub install task git-cloneTask git-clone(0.5) installed in default namespace# kubectl get task | grep git-clonegit-clone 54s1.2.3.4.
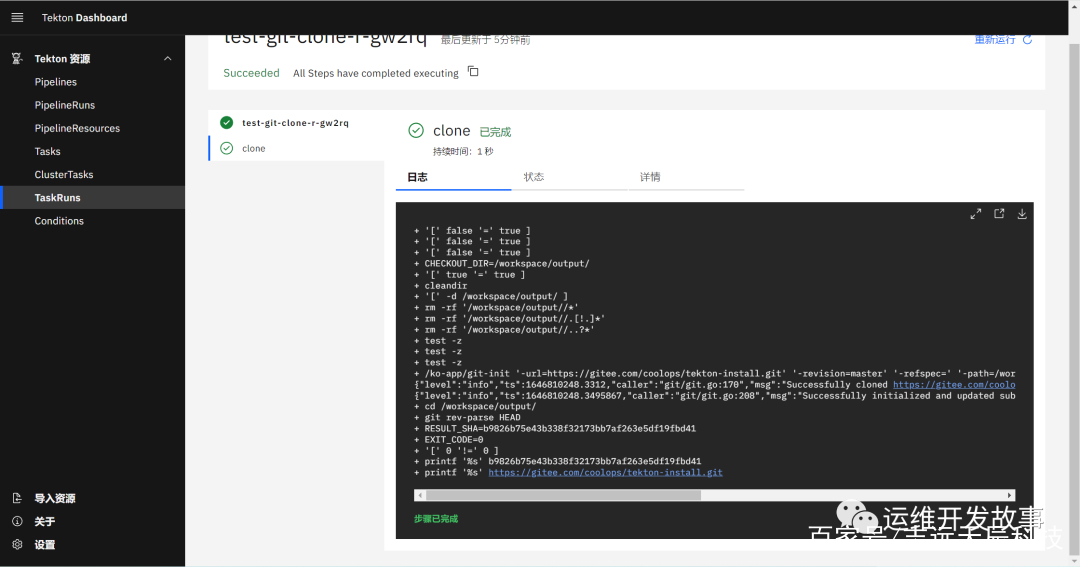
这个Task到底能不能满足我们的需求呢?我们可以创建一个TaskRun来进行测试,如下(由于还没有配置拉取代码仓库的用户名和密码,这里先用一个公开的仓库进行测试)。
apiVersion: tekton.dev/v1beta1kind: TaskRunmetadata:  name: test-git-clone
  namespace: defaultspec:  workspaces:    - name: output
      emptyDir: {}  params:  - name: url
    value: "https://gitee.com/coolops/tekton-install.git"
  - name: revision
    value: "master"
  - name: gitInitImage
    value: "registry.cn-hangzhou.aliyuncs.com/coolops/tekton-git-init:v0.29"
  taskRef:    name: git-clone1.2.3.4.5.6.7.8.9.10.11.12.13.14.15.16.17.18.
运行过后,可以看到代码正常拉取。 
 编辑搜图
编辑搜图
单元测试
单元测试比较简单,基本就是执行go test ./... 命令就行,比如。
> go test ./...ok devops-hello-world 0.313sok devops-hello-world/pkg (cached)1.2.3.
所以这个Task,只需要一个Go环境,能执行Go命令即可,如下:
apiVersion: tekton.dev/v1beta1kind: Task metadata:
  name: unit-testspec:
  workspaces:    - name: source
  steps:
    - name: unit-test
      workingDir: $(workspaces.source.path)      image: golang:1.17.5
      env:      - name: GOPROXY
        value: https://goproxy.cn
      command: ['go']
      args:      - "test"
      - "./..."1.2.3.4.5.6.7.8.9.10.11.12.13.14.15.16.17.18.
构建镜像/推送
为什么这里没有单独把应用构建组成一个Task呢?主要是我们在这里采用了多阶段构建,我们可以将应用构建-镜像打包写在一个Dockerfile中,所以这里只需要写一个Task。
apiVersion: tekton.dev/v1beta1kind: Task metadata:
  name: build-push-imagespec:
  params:    - name: pathToDockerfile
      description: The path to the dockerfile to build (relative to the context)      default: Dockerfile
    - name: imageUrl
      description: Url of image repository
    - name: imageTag
      description: Tag to apply to the built image
      default: latest
  workspaces:    - name: source
    - name: dockerconfig
      mountPath: /kaniko/.docker # config.json 的挂载目录
  steps:    - name: build-and-push
      image: registry.cn-hangzhou.aliyuncs.com/coolops/kaniko-executor:v1.5.0
      workingDir: $(workspaces.source.path)      command:        - /kaniko/executor
      args:        - --dockerfile=$(params.pathToDockerfile)        - --destination=$(params.imageUrl):$(params.imageTag)        - --context=$(workspaces.source.path)1.2.3.4.5.6.7.8.9.10.11.12.13.14.15.16.17.18.19.20.21.22.23.24.25.26.27.28.
我们这里采用kaniko进行构建镜像,用这种方式不用挂载docker.sock文件,但是我们需要将docker config保存在/kaniko/.docker目录下。我们可以通过如下命令来创建secret。
kubectl create secret docker-registry dockerhub --docker-server=https://index.docker.io/v1/ --docker-username=[USERNAME] --docker-password=[PASSWORD] --dry-run=client -o json | jq -r '.data.".dockerconfigjson"' | base64 -d > /tmp/config.json && kubectl create secret generic docker-config --from-file=/tmp/config.json && rm -f /tmp/config.json1.
如果在运行上面命令的时候没有jq命令,就需要你安装一下。
yum install jq -y1.
部署应用
这里采用的deployment的方式部署应用,所以只需要使用kubectl进行部署即可。
不过在使用kubectl的时候需要/root/.kube/config文件,所以这里依然将config文件通过secret挂载到容器中。
创建一个secret,如下:
kubectl create secret generic kubernetes-config --from-file=/root/.kube/config1.
然后创建Task,如下:
apiVersion: tekton.dev/v1alpha1kind: Taskmetadata:  name: deploy-to-k8sspec:  workspaces:    - name: source
    - name: kubernetesconfig
      mountPath: /root/.kube
  params:    - name: pathToYamlFile
      description: The path to the yaml file to deploy within the git source
      default: deployment.yaml
    - name: IMAGE
    - name: TAG
  steps:    - name: run-kubectl
      image: registry.cn-hangzhou.aliyuncs.com/coolops/kubectl:1.19.16
      workingDir: $(workspaces.source.path)      script: |
        sed -i s#IMAGE#$(params.IMAGE)#g $(params.pathToYamlFile)        sed -i s#TAG#$(params.TAG)#g $(params.pathToYamlFile)        kubectl apply -f $(params.pathToYamlFile)1.2.3.4.5.6.7.8.9.10.11.12.13.14.15.16.17.18.19.20.21.22.23.
整合成Pipeline
上面我们已经把每一步整理成了Task,下面就应该进行Pipeline的组合了,然后再声明需要的变量就可以,如下:
apiVersion: tekton.dev/v1beta1 kind: Pipeline metadata:
  name: devops-hello-world-pipeline spec:
  workspaces: # 声明 workspaces
    - name: go-repo-pvc
    - name: docker-config
    - name: kubernetes-config
  params:
    - name: git_url
    - name: revision
      type: string
      default: "master"
    - name: gitInitImage
      type: string
      default: "registry.cn-hangzhou.aliyuncs.com/coolops/tekton-git-init:v0.29"
    - name: pathToDockerfile
      description: The path to the build context, used by Kaniko - within the workspace
      default: .
    - name: imageUrl
      description: Url of image repository
    - name: imageTag
      description: Tag to apply to the built image
      default: latest
  tasks: # 添加task到流水线中
    - name: clone
      taskRef:
        name: git-clone
      workspaces:
        - name: output
          workspace: go-repo-pvc
      params:
        - name: url
          value: $(params.git_url)
        - name: revision
          value: $(params.revision)
        - name: gitInitImage
          value: $(params.gitInitImage)    - name: unit-test
      workspaces: # 传递 workspaces
        - name: source
          workspace: go-repo-pvc
      taskRef:
        name: unit-test
      runAfter:      - clone
    - name: build-push-image
      params:      - name: pathToDockerfile
        value: $(params.pathToDockerfile)      - name: imageUrl
        value: $(params.imageUrl)      - name: imageTag
        value: $(params.imageTag)      taskRef:
        name: build-push-image
      runAfter:        - unit-test
      workspaces: # 传递 workspaces
        - name: source
          workspace: go-repo-pvc
        - name: dockerconfig
          workspace: docker-config
    - name: deploy-to-k8s
      taskRef:
        name: deploy-to-k8s
      params:        - name: pathToYamlFile
          value: deployment.yaml
        - name: IMAGE
          value: $(params.imageUrl)        - name: TAG
          value: $(params.imageTag)      workspaces:        - name: source
          workspace: go-repo-pvc
        - name: kubernetesconfig
          workspace: kubernetes-config
      runAfter:        - build-push-image1.2.3.4.5.6.7.8.9.10.11.12.13.14.15.16.17.18.19.20.21.22.23.24.25.26.27.28.29.30.31.32.33.34.35.36.37.38.39.40.41.42.43.44.45.46.47.48.49.50.51.52.53.54.55.56.57.58.59.60.61.62.63.64.65.66.67.68.69.70.71.72.73.74.75.76.77.78.79.80.81.
运行测试
运行测试就是创建PipelineRun,不过在创建之前,我们先创建需要的认证信息。
apiVersion: v1 kind: Secret metadata:
  name: gitlab-auth
  annotations:
    tekton.dev/git-0: https://gitee.com/  # 这里使用的gitee仓库type: kubernetes.io/basic-auth stringData:
  username: xxxx
  password: xxxx---apiVersion: v1 kind: ServiceAccount metadata:
  name: tekton-build-sa secrets:
  - name: gitlab-auth---apiVersion: rbac.authorization.k8s.io/v1 kind: ClusterRoleBinding metadata:
  name: tekton-clusterrole-binding roleRef:
  apiGroup: rbac.authorization.k8s.io
  kind: ClusterRole
  name: edit subjects:
- kind: ServiceAccount
  name: tekton-build-sa
  namespace: default1.2.3.4.5.6.7.8.9.10.11.12.13.14.15.16.17.18.19.20.21.22.23.24.25.26.27.28.29.30.
然后我们就可以创建PipelineRun了,如下:
apiVersion: tekton.dev/v1beta1kind: PipelineRunmetadata:  name: devops-hello-world-pipeline-runspec:  pipelineRef:    name: devops-hello-world-pipeline
  params:    - name: revision
      value: master
    - name: git_url
      value: https://gitee.com/coolops/devops-hello-world.git
    - name: imageUrl
      value: registry.cn-hangzhou.aliyuncs.com/coolops/devops-hello-world
    - name: imageTag
      value: latest
    - name: pathToDockerfile
      value: Dockerfile
  workspaces:    - name: go-repo-pvc
      volumeClaimTemplate:        spec:          accessModes:          - ReadWriteOnce
          storageClassName: openebs-hostpath
          resources:            requests:              storage: 1Gi
    - name: docker-config
      secret:        secretName: docker-config
    - name: kubernetes-config
      secret:        secretName: kubernetes-config
  serviceAccountName: tekton-build-sa 1.2.3.4.5.6.7.8.9.10.11.12.13.14.15.16.17.18.19.20.21.22.23.24.25.26.27.28.29.30.31.32.33.34.35.
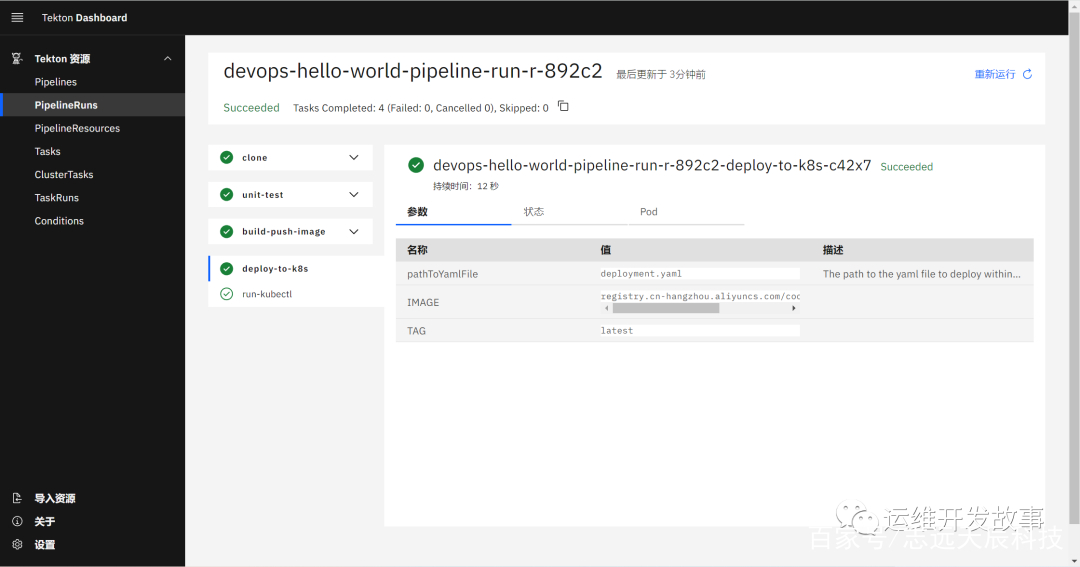
然后我们在Tekton的Dashboard上看到Pipeline运行成功。
 编辑搜图
编辑搜图
应用也启动成功。
# kubectl get po | grep httphttpserver-696479dd5d-qplnx 2/2 Running 0 2m18s1.2.
访问页面,返回正常。
# curl 10.102.140.2:8080{"data":300,"say":"Hello World"}1.2.
但是上面我们是固定的镜像TAG,在实际工作中,很多固定,所以我们对其改造一下。在Tekton Hub上的git-clone Task会输出commit results,我们可以使用commit ID作为镜像Tag,改造后的的Pipeline如下:
apiVersion: tekton.dev/v1beta1 kind: Pipeline metadata:
  name: devops-hello-world-pipeline spec:
  workspaces: # 声明 workspaces
    - name: go-repo-pvc
    - name: docker-config
    - name: kubernetes-config
  params:
    # 定义代码仓库
    - name: git_url
    - name: revision
      type: string
      default: "master"
    - name: gitInitImage
      type: string
      default: "registry.cn-hangzhou.aliyuncs.com/coolops/tekton-git-init:v0.29"
    # 定义镜像参数
    - name: pathToDockerfile
      description: The path to the build context, used by Kaniko - within the workspace
      default: .
    - name: imageUrl
      description: Url of image repository
    - name: imageTag
      description: Tag to apply to the built image
      default: latest
  tasks: # 添加task到流水线中
    - name: clone
      taskRef:
        name: git-clone
      workspaces:
        - name: output
          workspace: go-repo-pvc
      params:
        - name: url
          value: $(params.git_url)
        - name: revision
          value: $(params.revision)
        - name: gitInitImage
          value: $(params.gitInitImage)    - name: unit-test
      workspaces: # 传递 workspaces
        - name: source
          workspace: go-repo-pvc
      taskRef:
        name: unit-test
      runAfter:      - clone
    - name: build-push-image
      params:      - name: pathToDockerfile
        value: $(params.pathToDockerfile)      - name: imageUrl
        value: $(params.imageUrl)      - name: imageTag
        value: $(tasks.clone.results.commit)
      taskRef:
        name: build-push-image
      runAfter:        - unit-test
      workspaces: # 传递 workspaces
        - name: source
          workspace: go-repo-pvc
        - name: dockerconfig
          workspace: docker-config
    - name: deploy-to-k8s
      taskRef:
        name: deploy-to-k8s
      params:        - name: pathToYamlFile
          value: deployment.yaml
        - name: IMAGE
          value: $(params.imageUrl)        - name: TAG
          value: $(tasks.clone.results.commit)
      workspaces:        - name: source
          workspace: go-repo-pvc
        - name: kubernetesconfig
          workspace: kubernetes-config
      runAfter:        - build-push-image1.2.3.4.5.6.7.8.9.10.11.12.13.14.15.16.17.18.19.20.21.22.23.24.25.26.27.28.29.30.31.32.33.34.35.36.37.38.39.40.41.42.43.44.45.46.47.48.49.50.51.52.53.54.55.56.57.58.59.60.61.62.63.64.65.66.67.68.69.70.71.72.73.74.75.76.77.78.79.80.81.82.83.
我们在后面的Task中引用前面Task的 输出,使用$(tasks.clone.results.commit) 即可。
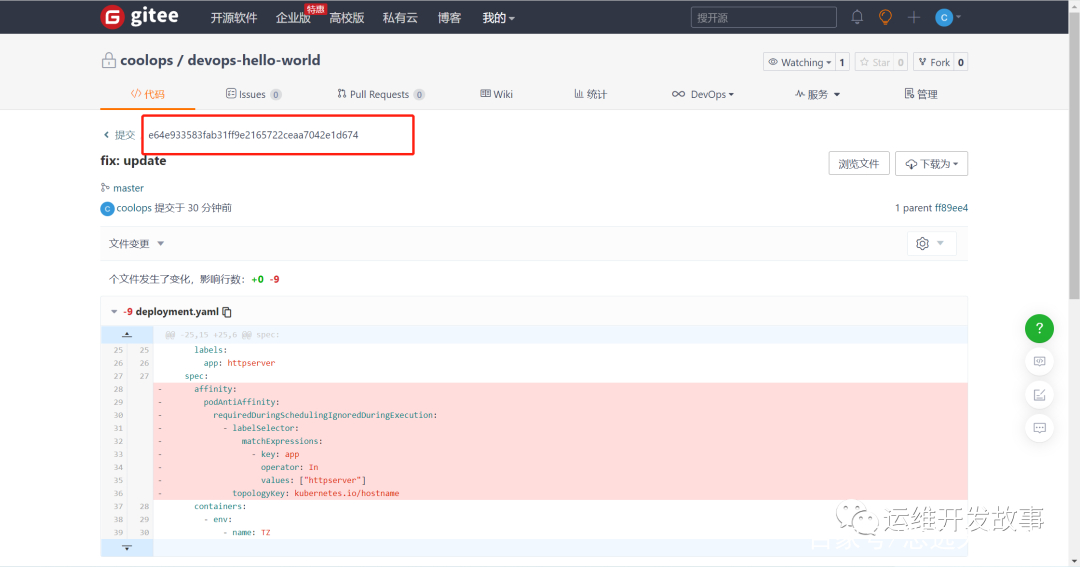
重新跑Pipeline,构建出来的镜像Tag就是commit ID,如下:
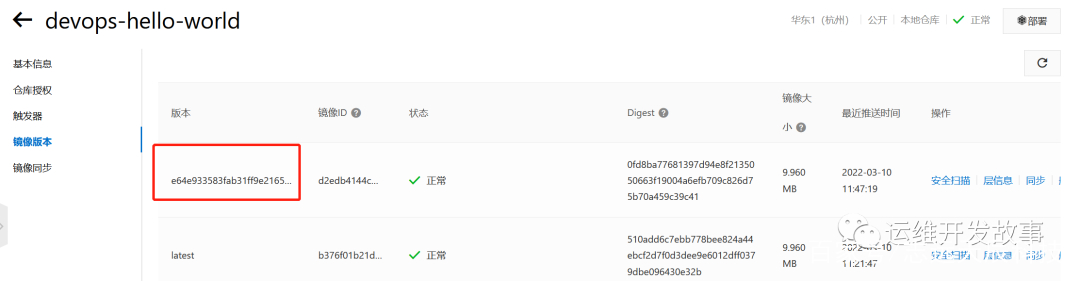
代码仓库最后一次提交的commit ID。
 编辑搜图
编辑搜图
总结
整个流水线看起来很简单,在调试的时候还是费一定的周折,主要是定义的参数传过去传过来,有时候就忘记指定了,就要不断的调试。