Swin Transformer实战:使用 Swin Transformer实现图像分类
Swin Transformer简介
目标检测刷到58.7 AP!
实例分割刷到51.1 Mask AP!
语义分割在ADE20K上刷到53.5 mIoU!
今年,微软亚洲研究院的Swin Transformer又开启了吊打CNN的模式,在速度和精度上都有很大的提高。这篇文章带你实现Swin Transformer图像分类。
资料汇总
论文: https://arxiv.org/abs/2103.14030
代码: https://github.com/microsoft/Swin-Transformer
论文翻译:https://wanghao.blog.csdn.net/article/details/120724040
一些大佬的B站视频:
2、ClimbingVision社区:震惊!这个关于Swin Transformer的论文分享讲得太透彻了!_哔哩哔哩_bilibili
关于Swin Transformer的资料有很多,在这里就不一一列举了,我觉得理解这个模型的最好方式:源码+论文。
环境配置
1、电脑环境:
操作系统:win10
CUDA版本:11.2
2、创建虚拟环境swin
conda create -n swin python=3.7 -y conda activate swin
3、安装pytorch
conda install pytorch==1.7.1 torchvision==0.8.2 torchaudio==0.7.2 cudatoolkit=11.0 -c pytorch
4、安装timm
pip install timm==0.3.2
5、安装apex
APEX是英伟达开源的,完美支持PyTorch框架,用于改变数据格式来减小模型显存占用的工具。其中最有价值的是amp(Automatic Mixed Precision),将模型的大部分操作都用Float16数据类型测试,一些特别操作仍然使用Float32。并且用户仅仅通过三行代码即可完美将自己的训练代码迁移到该模型。实验证明,使用Float16作为大部分操作的数据类型,并没有降低参数,在一些实验中,反而由于可以增大Batch size,带来精度上的提升,以及训练速度上的提升。
5.1 下载apex
网址 https://github.com/NVIDIA/apex,下载到本地文件夹。解压后进入到apex的目录安装依赖。在执行命令;
cd C:\Users\WH\Downloads\apex-master #进入apex目录
pip install -r requirements.txt
5.2 安装apex
依赖安装完后,打开cmd,cd进入到刚刚下载完的apex-master路径下,运行:
python setup.py install
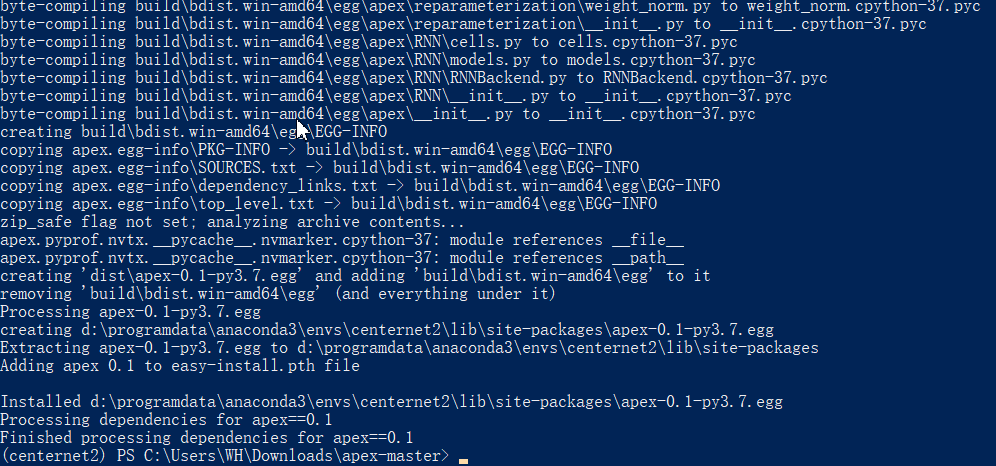
然后跑了一堆东西,最后是这样的:

安装完成!
6、安装一些其他的包
pip install opencv-python==4.4.0.46 termcolor==1.1.0 yacs==0.1.8
数据集
数据集采用最经典的猫狗大战数据集。数据集地址:链接:https://pan.baidu.com/s/1ZM8vDWEzgscJMnBrZfvQGw 提取码:48c3
如果连接失效请联系我,或者你也可以从别的途径获得。


项目结构
使用tree命令打印整个项目的结构
Swin-Transformer-main
    ├─configs#配置文件 ├─data#处理数据集相关的操作 │
    ├─dataset #数据集结构 │  ├─test │  ├─train
    │  │  ├─cat
    │  │  └─dog
    │  └─val
    │      ├─cat
    │      └─dog
    ├─figures
    ├─models#Swin的模型文件 │
    ├─output#训练模型的输出
训练
1、获取代码和预训练模型
从https://github.com/microsoft/Swin-Transformer下载代码,然后放到本地。然后解压。
在get_started.md找到预训练模型下载路径,下载下来然后放到Swin-Transformer根目录。

2、制作数据集
构建数据集,数据集结构如下:
dataset #数据集结构
    ├─test ├─train
    │  ├─cat │  └─dog
    └─val
           ├─cat └─dog
从原数据集中取出一部分数据集放入train对应的类别中,一部分放入val对应的类别中。把原数据集中的test直接复制到test中。
3、修改config.py文件
_C.DATA.DATA_PATH = 'dataset' # Dataset name _C.DATA.DATASET = 'imagenet' # Model name _C.MODEL.NAME = 'swin_tiny_patch4_window7_224' # Checkpoint to resume, could be overwritten by command line argument
_C.MODEL.RESUME ='swin_tiny_patch4_window7_224.pth' # Number of classes, overwritten in data preparation
_C.MODEL.NUM_CLASSES = 2
对上面参数的解释:
_C.DATA.DATA_PATH :数据集路径的根目录,我定义为dataset。
_C.DATA.DATASET:数据集的类型,这里只有一种类型imagenet。
_C.MODEL.NAME:模型的名字,对应configs下面yaml的名字,会在模型输出的root目录创建对应MODEL.NAME的目录。
_C.MODEL.RESUME:预训练模型的目录。
_C.MODEL.NUM_CLASSES:模型的类别,默认是1000,按照数据集的类别数量修改。
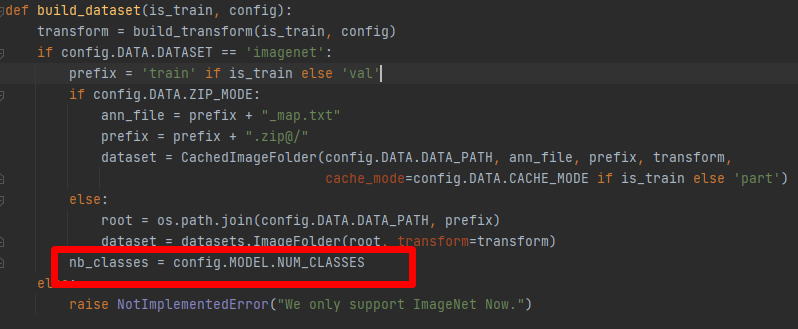
4、修改build.py
将nb_classes =1000改为nb_classes = config.MODEL.NUM_CLASSES

5、修改utils.py
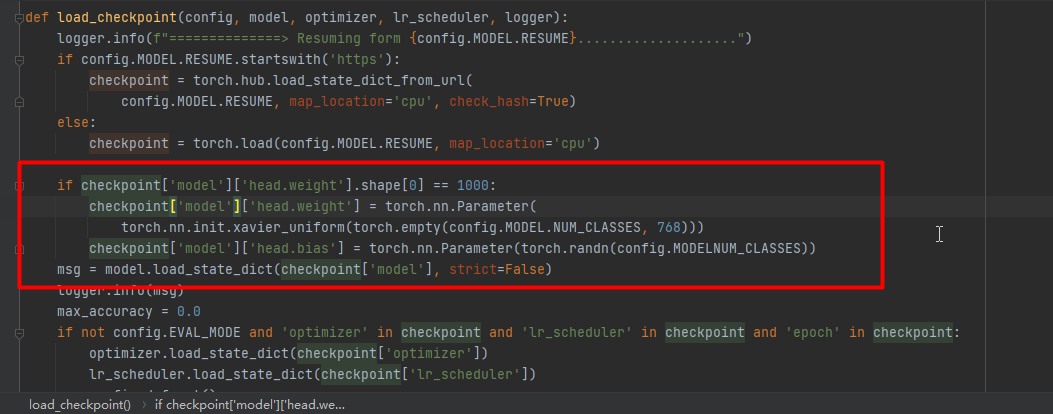
由于类别默认是1000,所以加载模型的时候会出现类别对不上的问题,所以需要修改load_checkpoint方法。在加载预训练模型之前增加修改预训练模型的方法:
if checkpoint['model']['head.weight'].shape[0] == 1000:
    checkpoint['model']['head.weight'] = torch.nn.Parameter(
        torch.nn.init.xavier_uniform(torch.empty(config.MODEL.NUM_CLASSES, 768)))
    checkpoint['model']['head.bias'] = torch.nn.Parameter(torch.randn(config.MODELNUM_CLASSES))
msg = model.load_state_dict(checkpoint['model'], strict=False)

6、修改main.py
将92-94注释,如下图:

将312行修改为:torch.distributed.init_process_group('gloo', init_method='file://tmp/somefile', rank=0, world_size=1)

7、运行训练命令
打开Terminal,运行如下命令:
python main.py --cfg configs/swin_tiny_patch4_window7_224.yaml --local_rank 0 --batch-size 16

如果想单独验证,运行命令:
python main.py --eval --cfg configs/swin_tiny_patch4_window7_224.yaml --resume ./output/swin_tiny_patch4_window7_224/default/ckpt_epoch_1.pth --data-path dataset --local_rank 0
推理
这个项目没有推理脚本,我自己写了一个。写这部分需要看懂验证部分的代码即可。
1、导入包和配置参数
import torch.utils.data.distributed
import torchvision.transforms as transforms from PIL import Image from torch.autograd import Variable
import os from models import build_model from config import get_config
import argparse

def parse_option():
    parser = argparse.ArgumentParser('Swin Transformer Test script', add_help=False)
    parser.add_argument('--cfg', default='configs/swin_tiny_patch4_window7_224.yaml', type=str, metavar="FILE", help='path to config file', )
    parser.add_argument( "--opts", help="Modify config options by adding 'KEY VALUE' pairs. ", default=None, nargs='+',
    )

    # easy config modification
    parser.add_argument('--batch-size', type=int, help="batch size for single GPU")
    parser.add_argument('--data-path', type=str, help='path to dataset')
    parser.add_argument('--zip', action='store_true', help='use zipped dataset instead of folder dataset')
    parser.add_argument('--cache-mode', type=str, default='part', choices=['no', 'full', 'part'], help='no: no cache, ' 'full: cache all data, ' 'part: sharding the dataset into nonoverlapping pieces and only cache one piece')
    parser.add_argument('--resume', default='output/swin_tiny_patch4_window7_224/default/ckpt_epoch_1.pth', help='resume from checkpoint')
    parser.add_argument('--accumulation-steps', type=int, help="gradient accumulation steps")
    parser.add_argument('--use-checkpoint', action='store_true', help="whether to use gradient checkpointing to save memory")
    parser.add_argument('--amp-opt-level', type=str, default='O1', choices=['O0', 'O1', 'O2'], help='mixed precision opt level, if O0, no amp is used')
    parser.add_argument('--output', default='output', type=str, metavar='PATH', help='root of output folder, the full path is <output>/<model_name>/<tag> (default: output)')
    parser.add_argument('--tag', help='tag of experiment')
    parser.add_argument('--eval', action='store_true', help='Perform evaluation only')
    parser.add_argument('--throughput', action='store_true', help='Test throughput only')
    parser.add_argument("--local_rank", default='0', type=int, help='local rank for DistributedDataParallel')
    args, unparsed = parser.parse_known_args()  config = get_config(args)

    return args, config
这个配置参数是为了创建模型,从main.py中复制过来,然后将required=True这样的字段删除。
定义class、创建transform
transform_test = transforms.Compose([
    transforms.Resize((224, 224)),
    transforms.ToTensor(),
    transforms.Normalize([0.5, 0.5, 0.5], [0.5, 0.5, 0.5])
])
classes = ("cat", "dog")
将图像resize为224×224大小
定义类别,顺序和数据集对应。
2、创建模型
DEVICE = torch.device("cuda:0" if torch.cuda.is_available() else "cpu")
_, config = parse_option()
model = build_model(config) checkpoint = torch.load('output/swin_tiny_patch4_window7_224/default/ckpt_epoch_1.pth', map_location='cpu')
model.load_state_dict(checkpoint['model'], strict=False)
model.eval()
model.to(DEVICE)
判断gpu是否可用,如果不可以使用cpu。
获取config参数
创建模型
加载训练的模型权重
将权重放入model中。
3、开始推理
定义测试集的路径,然后循环预测每张图片
path = 'dataset/test/'
testList = os.listdir(path) for file in testList:
    img = Image.open(path + file)
    img = transform_test(img)
    img.unsqueeze_(0)
    img = Variable(img).to(DEVICE) out = model(img)
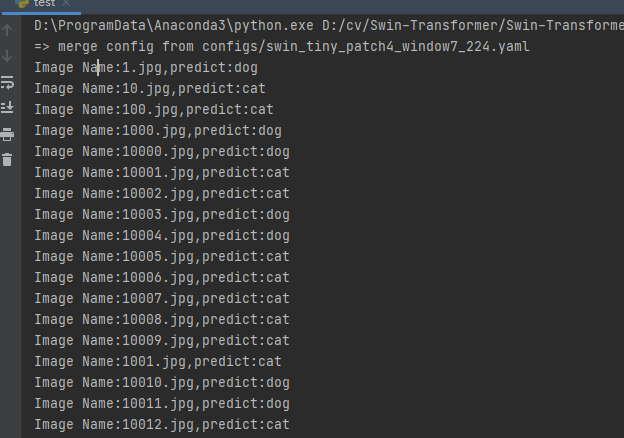
    # Predict _, pred = torch.max(out.data, 1) print('Image Name:{},predict:{}'.format(file, classes[pred.data.item()]))
结果如下:

4、完整代码:
import torch.utils.data.distributed
import torchvision.transforms as transforms from PIL import Image from torch.autograd import Variable
import os from models import build_model from config import get_config
import argparse

def parse_option():
    parser = argparse.ArgumentParser('Swin Transformer Test script', add_help=False)
    parser.add_argument('--cfg', default='configs/swin_tiny_patch4_window7_224.yaml', type=str, metavar="FILE", help='path to config file', )
    parser.add_argument( "--opts", help="Modify config options by adding 'KEY VALUE' pairs. ", default=None, nargs='+',
    )

    # easy config modification
    parser.add_argument('--batch-size', type=int, help="batch size for single GPU")
    parser.add_argument('--data-path', type=str, help='path to dataset')
    parser.add_argument('--zip', action='store_true', help='use zipped dataset instead of folder dataset')
    parser.add_argument('--cache-mode', type=str, default='part', choices=['no', 'full', 'part'], help='no: no cache, ' 'full: cache all data, ' 'part: sharding the dataset into nonoverlapping pieces and only cache one piece')
    parser.add_argument('--resume', default='output/swin_tiny_patch4_window7_224/default/ckpt_epoch_1.pth', help='resume from checkpoint')
    parser.add_argument('--accumulation-steps', type=int, help="gradient accumulation steps")
    parser.add_argument('--use-checkpoint', action='store_true', help="whether to use gradient checkpointing to save memory")
    parser.add_argument('--amp-opt-level', type=str, default='O1', choices=['O0', 'O1', 'O2'], help='mixed precision opt level, if O0, no amp is used')
    parser.add_argument('--output', default='output', type=str, metavar='PATH', help='root of output folder, the full path is <output>/<model_name>/<tag> (default: output)')
    parser.add_argument('--tag', help='tag of experiment')
    parser.add_argument('--eval', action='store_true', help='Perform evaluation only')
    parser.add_argument('--throughput', action='store_true', help='Test throughput only')
    parser.add_argument("--local_rank", default='0', type=int, help='local rank for DistributedDataParallel')
    args, unparsed = parser.parse_known_args()  config = get_config(args)

    return args, config  transform_test = transforms.Compose([
    transforms.Resize((224, 224)),
    transforms.ToTensor(),
    transforms.Normalize([0.5, 0.5, 0.5], [0.5, 0.5, 0.5])
])
classes = ("cat", "dog")


DEVICE = torch.device("cuda:0" if torch.cuda.is_available() else "cpu")
_, config = parse_option()
model = build_model(config)
checkpoint = torch.load('output/swin_tiny_patch4_window7_224/default/ckpt_epoch_1.pth', map_location='cpu')
model.load_state_dict(checkpoint['model'], strict=False)
model.eval()
model.to(DEVICE)

path = 'dataset/test/' testList = os.listdir(path) for file in testList:
    img = Image.open(path + file)
    img = transform_test(img)
    img.unsqueeze_(0)
    img = Variable(img).to(DEVICE)
    out = model(img)
    # Predict
    _, pred = torch.max(out.data, 1) print('Image Name:{},predict:{}'.format(file, classes[pred.data.item()]))
总结
本文带领大家学习了如何使用Swin Transformer实现图像分类。通过这篇文章你学习到了Swin Transformer的环境配置和一些参数配置,学会了如何写推理的脚本。
